Install Your Water Heater Like a Pro: Top Tips and Tricks
August 15, 2025
When your water heater fails—showing signs like rusty water, strange noises, or no hot water—a reliable water heater installation guide is crucial for a quick, cost-effective replacement.
Quick Installation Overview:
Most residential water heaters last 10 to 15 years. As one industry expert noted: "When your water heater begins to leak, you have to replace it fast."
Common signs your water heater needs replacement:
This is a challenging project that takes experienced DIYers 6 to 8 hours, involving both plumbing and electrical work where safety is critical. Improper installation can lead to gas leaks, fires, or water damage, which is why many homeowners opt for professional installation for safety and warranty protection.

Proper planning is what separates a smooth, successful project from a weekend disaster. This water heater installation guide will walk you through everything to consider before you touch your old unit.
Choosing the wrong size or type won't meet your family's needs.
Storage tank water heaters are the common, budget-friendly choice, keeping a large tank of water hot 24/7. A family of four typically needs at least a 50-gallon tank.
Tankless water heaters heat water on demand, providing an endless supply. They're more efficient but have a higher upfront cost and may require electrical upgrades.
Heat pump water heaters are highly efficient, pulling heat from the air to warm water. They require more space and have a higher initial cost but offer significant long-term savings.
Match your choice to your household's peak hour demand—the busiest hot water time. Also, check the Uniform Energy Factor (UEF) rating; since water heating accounts for about 18% of household energy use, an efficient model saves money. Newer models are often larger than old ones of the same capacity, so measure your space carefully.
| Water Heater Type | Upfront Cost | Energy Efficiency | Lifespan | Key Pros | Key Cons |
|---|---|---|---|---|---|
| Conventional Tank | Low | Moderate | 10-15 years | Reliable, lower initial cost | Heats water constantly, limited supply |
| Tankless | High | High | 20+ years | On-demand hot water, energy savings | Higher initial cost, potential upgrades |
| Heat Pump (Hybrid) | High | Very High | 10-15 years | Significant energy savings | Higher initial cost, requires space/airflow |
Just like when homeowners research why you should install a pool heater in Palmetto Bay, understanding your needs helps you make the smartest choice.
Water heater installation involves electricity, water, and potentially gas. Mistakes can lead to shock, leaks, or water damage.
Improper installation can cause electrical fires, gas leaks, carbon monoxide poisoning, or water damage. Most communities require permits and inspections to ensure the work meets local building codes and protects your family. For peace of mind, professional services like our Water Heater Repair in Miami, FL prioritize safety.

Having everything ready prevents mid-project trips to the hardware store.
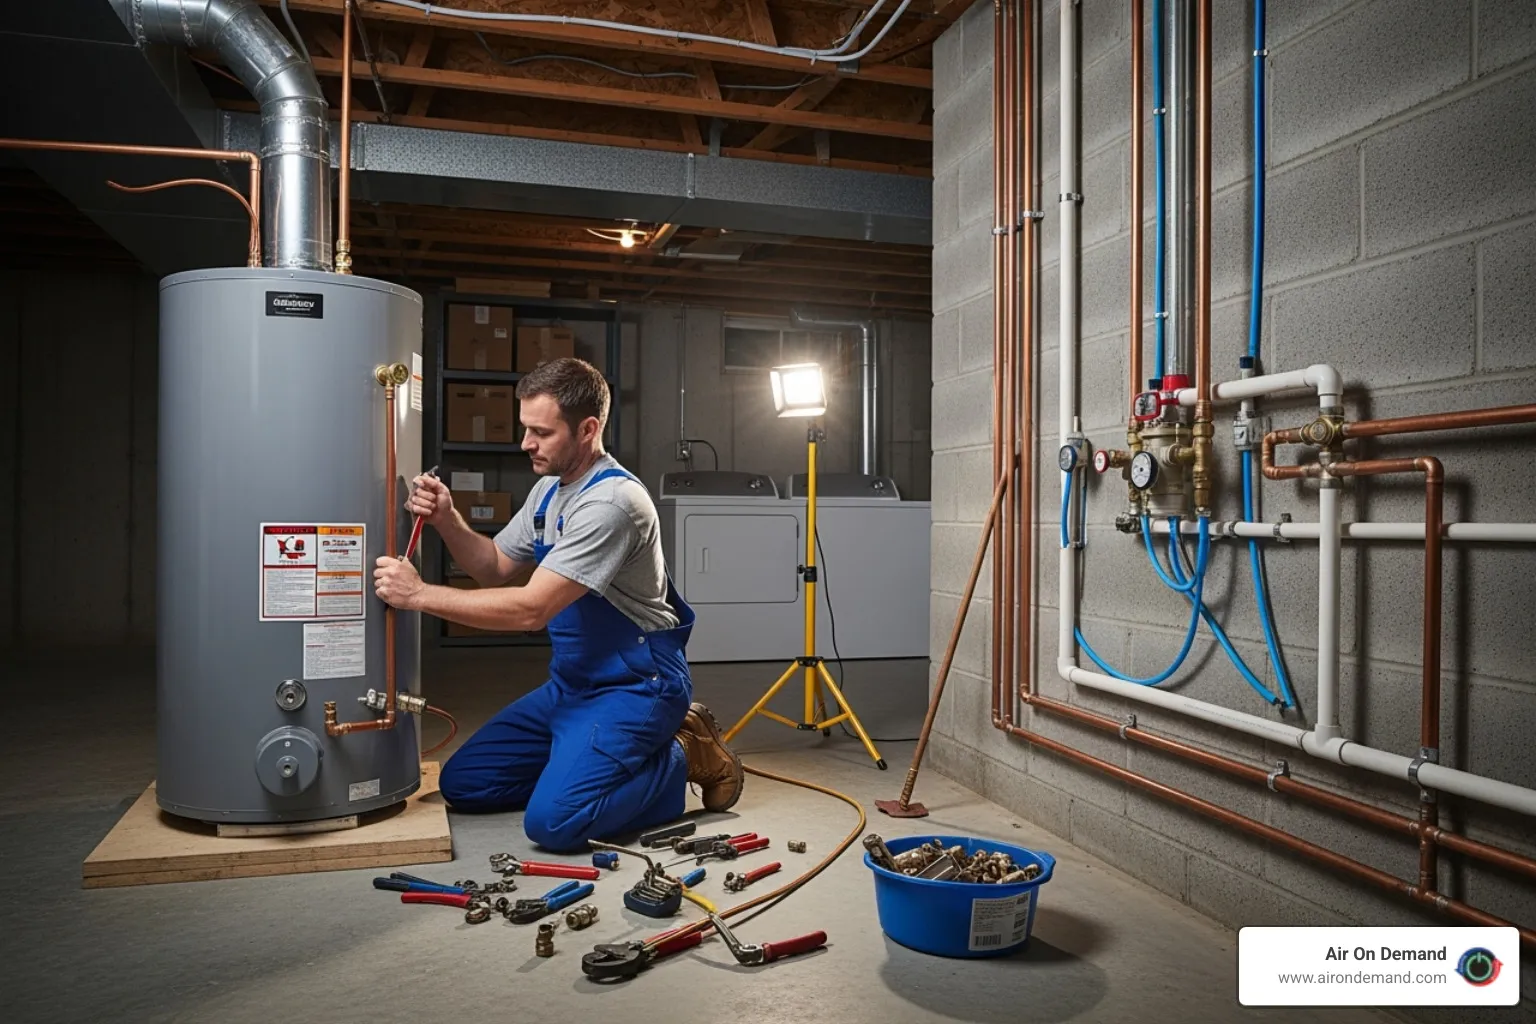
Tools: You'll need pipe wrenches, an adjustable wrench, a tubing cutter (for copper), a level, a voltage tester, a bucket, a garden hose, and screwdrivers. An appliance dolly or a helper is essential, as empty tanks weigh around 150 pounds.
Materials: Get your new water heater, flexible water supply lines, Teflon tape, a new temperature and pressure (T&P) relief valve (never reuse the old one), a proper discharge pipe, heat trap fittings, and a drain pan.
Safety Gear: Don't forget sturdy gloves, eye protection, and work boots.
This is a challenging DIY project that can take 4 to 8 hours. We'll walk through each step, but always keep your manufacturer's instructions handy, as each model is slightly different.
First, ensure the power and water are off.
Draining the tank: Connect a garden hose to the drain valve at the bottom of the unit and run it to a floor drain or outside. Open the valve, then open a hot water faucet upstairs to let air in and speed up the process. This can take a while, especially with sediment buildup.

Disconnect utilities: For electric units, disconnect the wiring at the access panel. For gas units, shut off the gas, disconnect the line at the union, and cap it immediately. Use pipe wrenches to disconnect the hot and cold water lines.
Remove the old unit: Even empty, tanks are heavy (100-150 lbs). Use an appliance dolly or a helper to move it.
Clean the area: Clean up any rust or sediment from the installation space. If this seems overwhelming, our team handles Water Heater Replacement in Miami, FL professionally.

Position and level: Place the new heater with at least 6 inches of clearance on all sides. Use a carpenter's level and shims to ensure it's perfectly level for proper performance.
Install safety valves: Screw the new Temperature and Pressure (T&P) relief valve into its port, using Teflon tape on the threads. The discharge pipe must connect to this valve and terminate no more than 6 inches from the floor or a drain.
Connect water lines: Install heat trap fittings to improve efficiency (blue for cold inlet, red for hot outlet). Connect the water supply lines—flexible connectors are often easier than soldering copper. Use Teflon tape on all threaded connections, but do not overtighten.
Crucially, fill the tank completely before turning on the power to avoid permanently damaging the heating elements. Close the drain valve, slowly open the cold water supply, and run hot water faucets throughout your home until water flows steadily without sputtering. This purges all air from the system.
Check for leaks: With the tank full, carefully inspect every new connection for drips. Tighten any leaking fittings.
Connect the electrical supply: Following the manufacturer's wiring diagram, connect the electrical supply, ensuring the unit is properly grounded. Most standard units require a dedicated 30-amp circuit. Replace all access plates and insulation.
You've just completed a major home improvement project! For expert help from the start, our team provides professional Water Heater Installation in Homestead, FL.
Congratulations on installing your new water heater! Now, let's ensure it works perfectly and set it up for years of reliable service.
You're at the finish line of this water heater installation guide. Let's cover the final steps.
Power up and set temperature: Restore power at the main circuit breaker. We strongly recommend setting the thermostat to 120 degrees Fahrenheit. This is the ideal balance for safety and efficiency—it's hot enough for your needs, helps prevent harmful bacteria growth, and is cool enough to prevent most scald injuries.
Test the system: Allow the heater a few hours to heat the water fully. Then, turn on a hot water faucet to check for a steady flow. If you notice reduced pressure, debris may have clogged your faucet aerators. Simply unscrew them, clean them out, and screw them back on.
Long-term maintenance: Protect your investment with these simple tasks:
For homeowners who prefer professional support, our team provides comprehensive Water Heater Maintenance in Cutler Bay, FL to keep your unit running efficiently for years.
After reading our water heater installation guide, you might feel ready for a DIY project. However, this is a complex job that combines plumbing, electrical work, and potentially gas lines—each with serious risks.
Considering DIY? You can save on labor costs and gain a sense of accomplishment. However, be prepared for a challenging project that can take 6-8 hours or more. The biggest concerns are the consequences of mistakes:
Why Hire a Professional? Licensed contractors offer peace of mind through expertise and safety. They can typically complete an installation in just 2-3 hours, handle all permits, ensure code compliance, and dispose of your old unit.
You should always call a professional if:
For complex jobs or when you want the confidence of expert service, consider our team for Water Heater Installation in Palmetto Bay, FL. Sometimes, the smartest DIY decision is knowing when to call the pros.
When you're looking at a water heater installation guide and planning a DIY project, questions are bound to come up. Here are answers to some of the most common ones.
You can't put a 150-pound water heater in your regular trash. Your best options are to check with your local waste management for large appliance pickup, take it to a scrap metal dealer for recycling, or ask the retailer you bought the new unit from about their removal services. Professional installers almost always include removal and disposal as part of their service.
While this project is manageable, the risks of getting it wrong are serious.
These risks are why attention to detail is critical and why many homeowners opt for a professional.
In most cases, yes, a permit is required. This isn't just red tape; it's a safety measure. The permit process ensures your installation is inspected by a local official to verify it meets all current plumbing, electrical, and gas safety codes. This protects your family, your home, and is often necessary for homeowner's insurance claims and for the future sale of your home. Always check with your local building department before you begin.
We've journeyed through this water heater installation guide together, from identifying the signs of a failing unit to the final steps of testing your new one. We've covered choosing the right model, the critical safety precautions, and the importance of the 120°F temperature setting for both safety and savings.
Safety is paramount when working with electricity, water, and potentially gas. The risks of an improper installation are significant, but they are completely avoidable with a careful, informed approach. Whether you choose to DIY or hire a professional depends on your comfort level and the project's complexity. There's no shame in calling an expert, especially for gas lines or electrical work.
A properly installed water heater is a long-term investment in your home's comfort and safety. With routine maintenance, your new unit will provide reliable hot water for years.
When you prefer to leave it to the experts, our team at Air On Demand is ready to help. We bring the same attention to detail and commitment to quality to our plumbing services as we do to our HVAC solutions.
Ready for endless hot water with complete peace of mind? For expert water heater installation in Miami, FL, contact us today! We'll ensure your hot water flows reliably and safely.