The Ultimate DIY Guide: Gas, Hot Water, and Tank Installation Secrets Revealed
July 18, 2026
Gas water heater installation is a complex project involving plumbing, gas fitting, and venting. While a DIY approach is possible, it demands thorough preparation, the right tools, and strict adherence to safety protocols to avoid serious risks like gas leaks or carbon monoxide poisoning.
The process typically takes 2-6 hours, with simple replacements being faster than new installations requiring modifications. Key safety considerations include proper ventilation, secure gas line connections, and compliance with local building codes, which often require permits.
Be aware that modern, energy-efficient water heaters are often larger than older models due to increased insulation. Units made after 2015 have stricter requirements, and tanks over 55 gallons usually need direct venting instead of traditional chimney venting.
While DIY can save on labor costs, improper installation can lead to dangerous conditions and code violations, potentially affecting your home's insurance and resale value.

Successful gas water heater installation hinges on thorough preparation and unwavering attention to safety. If you feel uncertain about working with gas lines, calling a professional is the safest choice for you and your family.
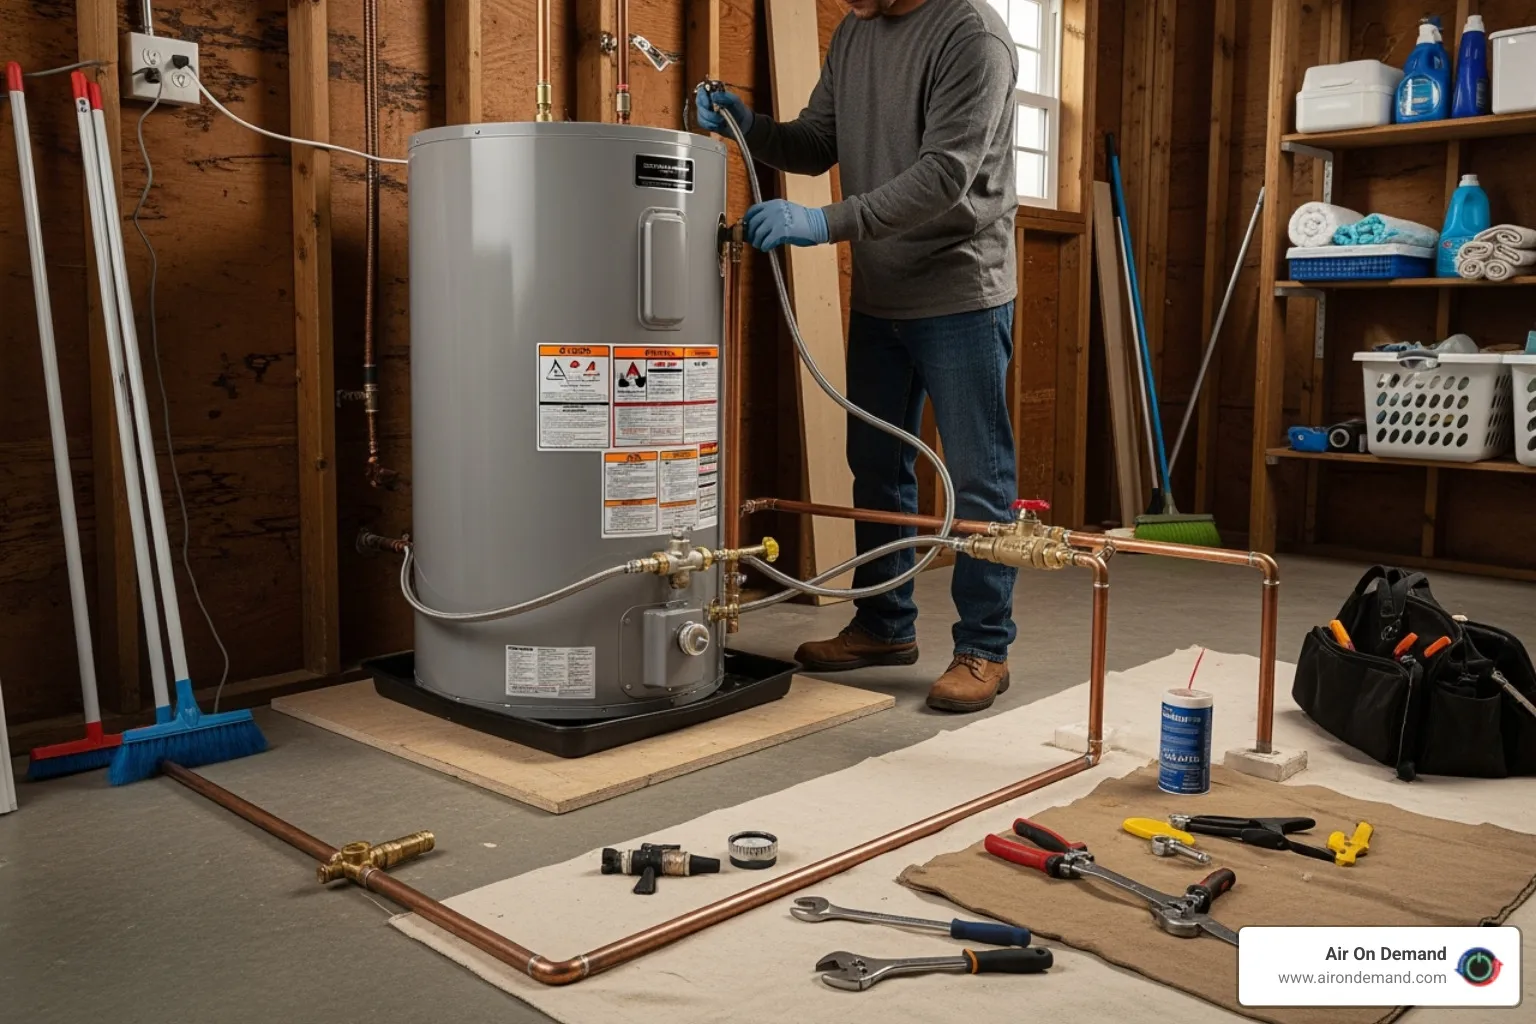
To avoid multiple trips to the hardware store, gather all your tools and materials first. You'll need two pipe wrenches for counter-torquing connections, a tubing cutter for copper pipes, and basic screwdrivers. For sealing, have yellow gas-rated Teflon tape (never use white plumbing tape on gas lines) and pipe joint compound on hand. A flexible gas line connector and flexible braided stainless steel water connectors will make the job much easier and safer.
Key components for a code-compliant installation include a drain pan to place under the heater, an expansion tank to absorb pressure, and dielectric unions to prevent corrosion between copper and steel fittings. You'll also need a garden hose to drain the old unit, an appliance dolly to move the heavy tanks, and safety gear like gloves and glasses. A carbon monoxide detector near the installation site is a non-negotiable safety requirement.
Before buying a new unit, measure your space carefully. Water heaters made after 2015 are often larger than older models of the same capacity due to increased insulation. Check the Energy efficiency guidelines for certified models to save on energy bills long-term.
Safety is paramount when dealing with natural gas. Your preparation must be methodical.

First, shut off all utilities. Turn the gas shutoff valve perpendicular to the pipe. Close the cold water supply valve to the heater, and consider shutting off the main water supply to prevent flooding. If your heater has an electric igniter, turn off the corresponding circuit breaker.
Proper ventilation is crucial to prevent the buildup of deadly carbon monoxide. Ensure the area is well-ventilated and remember that larger tanks (55+ gallons) often require direct venting to the outside. Maintain at least 6 inches of clearance on all sides of the heater for airflow and future maintenance, and clear any combustible materials from the area.
Finally, ensure the surface for the new unit is perfectly level, using shims if necessary. A level heater operates more efficiently and reduces stress on connections. Always familiarize yourself with local building codes and permit requirements before you begin.
With preparation complete, it's time to remove the old water heater. This step can be messy and physically demanding, so be prepared.
First, drain the tank completely. Attach a garden hose to the drain valve at the bottom and run it to a floor drain or outside. To help it drain faster, open a hot water faucet somewhere in the house to break the vacuum inside the tank. The water will be hot, and be prepared for sediment to slow the process or clog the valve.

Once empty, disconnect the water lines using adjustable wrenches. If you have soldered copper pipes, use a tubing cutter. Next, carefully disconnect the gas line. Use two pipe wrenchesone to hold the gas control valve steady and the other to turn the connectorto avoid damaging the valve. Finally, remove the vent pipe from the top of the unit, which is typically held by a few screws.
With all lines disconnected, use an appliance dolly to remove the old unit. These tanks are heavy, especially with residual sediment, so get help if needed.
Before installing the new heater, inspect the existing vent pipe thoroughly. Look for any signs of rust, holes, corrosion, or sagging. A compromised vent system is a serious safety hazard and must be replaced before proceeding. For detailed guidance, consult resources like this Water Heater Installation Guide or an article on checking your water heater vent system. Once the vent system is confirmed to be in good condition, you're ready to install the new unit.
Now it's time to install your new water heater. Careful execution here is key. If this process seems daunting, professionals like our team at Air On Demand handle Water Heater Installation in Miami FL daily and can ensure a safe, stress-free installation.
First, place the drain pan where the heater will sitthis is often required by code. Carefully move the new unit into the pan, using a level to ensure it's stable. Use shims to correct any wobbling. Confirm you have at least 6 inches of clearance on all sides.
Next, install the heat trap fittings on the cold water inlet (blue) and hot water outlet (red) if they aren't built-in. Wrap the threads with Teflon tape or pipe joint compound and tighten them, ensuring any directional arrows point away from the tank.
Now, connect your water lines. Flexible braided stainless steel connectors are much easier to use than rigid pipe. Connect the cold water supply to the inlet and the hot water line to the outlet. Use dielectric unions if connecting steel fittings to copper pipes to prevent corrosion. Tighten all connections snugly but do not overtighten.
Finally, install the T&P (Temperature and Pressure Relief) valve. Wrap its threads with Teflon tape, screw it into the designated port, and attach a discharge pipe that slopes downward to a safe drainage location. The end of this pipe must be unobstructed and no more than 6 inches from the floor or drain.

This step requires absolute precision. Double-check that the gas is off. Clean the threads on the gas supply pipe. Apply yellow gas-rated tape or pipe compound to the threads of your flexible gas connector. Connect one end to the supply valve and the other to the heater's gas control valve, using two wrenches to avoid damaging the valve. Ensure the flexible line has no sharp kinks.
Install a drip leg (sediment trap) just before the gas control valve; this is required by most codes to catch debris and moisture. For venting, secure the draft diverter on top of the heater's flue outlet. Connect the vent pipe, ensuring a continuous upward slope of at least 1/4 inch per foot of horizontal run. Secure all sections with sheet metal screws and proper hangers to prevent sagging.
We're almost done. First, ensure the drain valve is closed. Slowly turn on the water supply and listen for the tank to fill. As it fills, check all your new water connections for leaks. Bleed air from the system by opening the nearest hot water faucet until water flows in a steady stream.
Now, light the pilot. Slowly open the gas supply valve. Follow the manufacturer's instructions printed on the heater. This typically involves turning the control knob to "Pilot," pressing it down, and using the igniter button or a long match. Hold the knob down for about a minute after the pilot lights to allow the thermocouple to heat up. Once the pilot stays lit, turn the knob to "ON" and set the thermostat to 120 F. This temperature is energy-efficient and helps prevent scalding. Listen for the main burner to ignitethe sound of a successful installation.
You've done it! Your new gas water heater is installed. But before we celebrate with a hot shower, there are a few critical final checks to ensure everything is operating safely and correctly.
1. Testing for gas leaks: This is arguably the most important safety check. We want to be absolutely certain there are no gas leaks. Mix one part liquid dish soap with two parts water in a spray bottle. Generously spray the soapy water solution onto all new gas connections you made. Watch closely. If you see any bubbles forming, it indicates a gas leak. Immediately turn off the gas supply, tighten the connection, and retest. If the leak persists, do not operate the water heater and call a professional immediately.
2. Checking for proper vent draft (smoke test): With the water heater burner running, hold a smoking match or a smoke pencil near the draft hood (the cap on top of the water heater where the vent pipe connects). The smoke should be drawn up into the vent pipe. If the smoke blows back out or doesn't move, it indicates improper venting. This is a serious issue that can lead to carbon monoxide buildup. Turn off the water heater immediately and seek professional help.
3. Testing the T&P valve: While you don't typically "test" the T&P valve by fully discharging it immediately after installation, you should monitor its discharge pipe. After a few hours of operation, check the end of the T&P discharge pipe for any drips. Persistent dripping can indicate that the pressure inside your tank is too high, which might require a pressure-reducing valve for your home's main water line or professional diagnosis.
While we've walked you through a comprehensive DIY guide, it's important to be realistic about the challenges. Here's a quick comparison to help you understand when DIY might be biting off more than you can chew:
• Cost — DIY Installation: Potentially significant savings on labor. — Professional Installation: Higher upfront cost due to labor.
• Expertise — DIY Installation: Requires extensive knowledge of plumbing, gas, and venting. — Professional Installation: Performed by licensed, experienced technicians.
• Safety Assurance — DIY Installation: High risk of gas leaks, CO poisoning, and other hazards if done incorrectly. — Professional Installation: Minimized risk due to professional training and safety protocols.
• Code Compliance — DIY Installation: Requires thorough understanding of local codes and permit requirements. — Professional Installation: Technicians are knowledgeable about local codes and handle permit processes.
• Warranty Protection — DIY Installation: Manufacturer warranty may be voided by improper DIY installation. — Professional Installation: Installation by certified pros maintains manufacturer warranty and often includes labor warranty.
• Time & Effort — DIY Installation: Can be very time-consuming, frustrating, and physically demanding. — Professional Installation: Quick and efficient, with minimal disruption to your routine.
• Disposal of Old Unit — DIY Installation: You are responsible for proper disposal. — Professional Installation: Professionals typically handle the removal and environmentally compliant disposal.
Some specific challenges that often lead to calls for professional help include soldered pipes, code uncertainty, gas line modifications, and fixing improper venting issues or high water pressure.
For something as critical and potentially dangerous as a gas water heater installation, the benefits of hiring a professional often outweigh the perceived savings. Our certified technicians at Air On Demand possess the knowledge to handle every aspect of the installation safely and efficiently. We ensure your installation is compliant with all local codes in areas like Cutler Bay FL, Miami FL, and Lake Havasu City AZ, and that your manufacturer's warranty is protected. This offers complete peace of mind knowing the job is done right.
After walking through this comprehensive gas water heater installation guide, we know you might still have some questions. These are the questions we hear most often from homeowners.
A straightforward replacement where existing plumbing, gas lines, and venting are in good shape typically takes 2 to 4 hours. However, if the project involves more complex work—like upgrading from an electric unit, relocating the heater, or finding corroded pipes—it can take 4 to 6 hours or more.
An expansion tank is a safety device. When water heats, it expands (a process called thermal expansion). In a modern, closed-loop plumbing system, this expanding water has nowhere to go, creating dangerous pressure buildup. The expansion tank contains an air cushion that absorbs this excess pressure, protecting your water heater, pipes, and fixtures from damage. Many local codes now require an expansion tank with any new water heater installation.
Improper venting is extremely dangerous because it can cause carbon monoxide to build up in your home. Watch for these warning signs:
• Melted plastic or scorch marks on top of the heater.
• Condensation or moisture on the unit or vent pipe.
• A persistent "rotten egg" smell or visible soot near the burner.
• A yellow or orange burner flame instead of a crisp blue one.
• Your carbon monoxide detector alarm goes off.
If you suspect any venting issues, turn off the unit immediately and call a professional. Do not operate the water heater until it has been inspected and repaired.
Completing a gas water heater installation yourself can be rewarding, but this is a project where safety must always come first. Working with natural gas carries significant risks, and there is no shame in calling a professional if you feel the job is beyond your scope.
To ensure your new water heater has a long, efficient life, commit to regular maintenance. This includes an annual inspection of the T&P valve and vent system, flushing the tank to remove sediment, and checking the anode rod, which protects your tank from corrosion.
If you're in the Miami area and decide professional expertise is the right choice, our team at Air On Demand is here to help. We offer convenient online booking, fast service, and real-time updates to make the process seamless. We ensure the job is done right the first time, backed by strong warranties that protect your investment.
Ready to leave the heavy lifting to the pros? Schedule Your Water Heater Replacement in Miami, FL with us today and enjoy the peace of mind that comes with a safe, professional installation.